Simply fantastic and hope this will encourage others
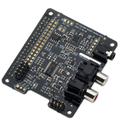
For Pi-DAC+ Full-HD audio card
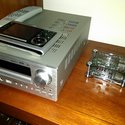
Objective was to have my music files ripped to FLAC format play through my amplifier, although Sony have a device that caters for this it costs over a £1000, I did all what that can do for £80.
OK, I’m old school and have listened to my music for the last 40 years when it used to be a celebration playing an album. You would read the sleeve from front to back and place the vinyl on a state of the art turntable connected to a quality amp pumping the sound out of speakers that you had lied to your wife about the cost of. Those days have gone and the compulsion seems to be listening to tracks and not albums, it was in the early days of this technology listening to Bowie converted to MP3 format I could not understand why instruments were missing and the sound was very basic, I could not believe how much MP3 strips out so now only play FLAC lossless formats and I tend to listen to albums not just tracks.
So how was I going to playback all this stuff stored on my hard drive.
What I wanted was to see all my albums listed on my phone, select an album and playback starts through my amplifier, so this is what I did to achieve this
Listed Components:
• Raspberry Pi DAC+ HAT Full-HD audio card by IQaudIO.com (tindie)
• IQaudIO.com Pi-CASE+ (For Pi B+ and DAC+) (tindie)
• Raspberry Pi B+ Desktop (700MHz Processor, 512MB RAM, 4x USB Port) (Amazon)
• Raspberry Pi UK Micro USB Power Supply (Amazon)
• Edimax EW-7811UN 150Mbps Wireless Nano USB Adapter (Amazon)
• HDMI Cable (Already got)
• Ethernet Cable (Already got)
• Samsung 32 GIG Micro SD Card (Already got)
• Voyager Air 1TB powered Hard Drive (Already got)
• Audio Phono Cable (Already got)
• HTC One Android Phone (Already got)
Software:
• Operating system image flashed to memory card ‘5_OpenELEC-RPi.arm-5.0.0_iqaudio’
(Free and supplied by IQaudIO.com with support written in for Pi DAC+)
• SD Formatter
(Free and used to format your card correctly)
• Win32DiskImager
(Free and used to flash image to memory card)
• Yatse Remote Control app for XBMC/Kodi
(Free but paid for pro version to support developer)
Process Steps:
1. Build your Raspberry PI and Pi DAC+ HAT Full-HD audio card enclosing all in the case (help from IQaudIO.com and tindie is fantastic)
2. Download all relevant software listed above
3. Insert memory card to PC and format with SD Formatter
4. Flash operating system image using Win32DiskImager to memory card
5. Now insert the card into your pi, connect to a monitor with HDMI, USB a powered hard drive holding all your media, attach Wireless Nano USB Adapter, attach Ethernet cable straight from router.
6. Now connect the power to the pi and turn on, just sit back and wait, in my case it took less than 30 seconds to boot up, I’ve read while researching that in some cases it can take a long time.
7. Once booted up you will see the XBMC/Kodi home page and this will now need setting up, loads of good Youtube videos showing how to do this, such as telling the system where your media is, setting up a wireless connection, setting the sound output to Pi DAC. As I’m running a blind system (no monitor) I double checked everything before removing from TV display. Install Yatse on your phone and it should detect your pi automatically, make sure your connected and use the app to shut down the system.
8. Now connect the pi to your amp and turn hard drive on first and then the pi and wait 5 mins or so, boot up Yatse on your phone and press and hold the Music icon and it should update and display all of the media, done
Tips:
• Set up the option to scan media library on boot up from within XBMC/Kodi
• Make sure all you music folders are properly tagged as this stops media software flirting tracks out of folders and also help’s display album art work on your phone, I used TagSanner free to download and use
• If like me you only wish to play music from your system choose to not show weather, video, photographs menus from within XBMC/Kodi and the Yatse app, this will give everything a cleaner interface
• If your hard drive is not powered use a powered USB hub
Hope this has been some help to anyone thinking of doing all this and may I stress the service and quality of hardware from both ‘tindie’ and ‘IQaudIO.com’ was great!
tj