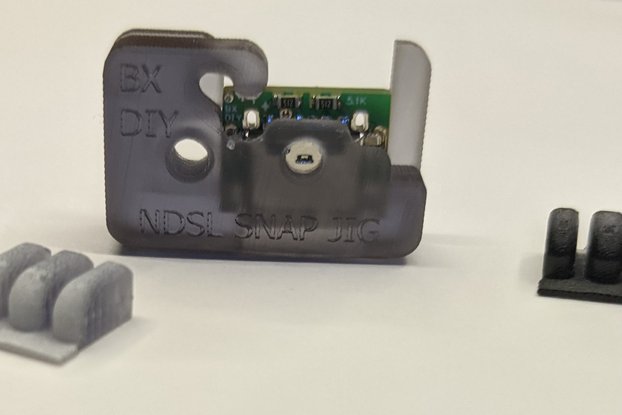
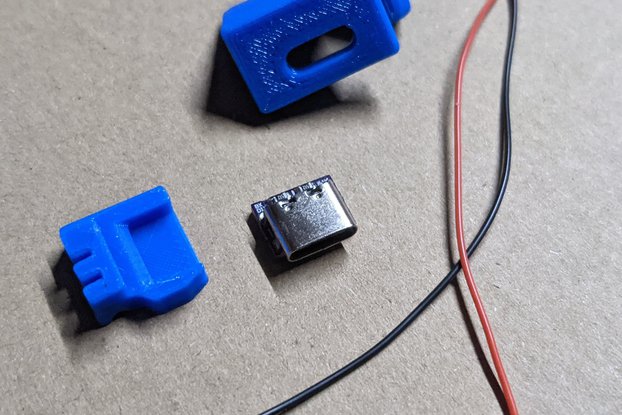
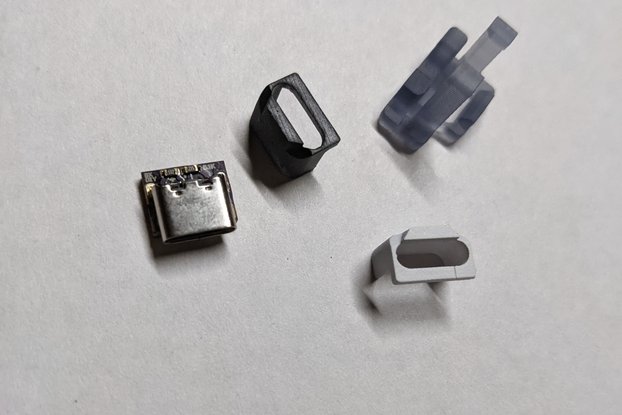
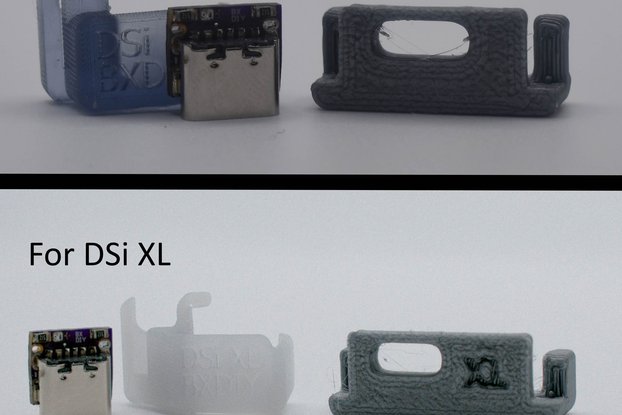
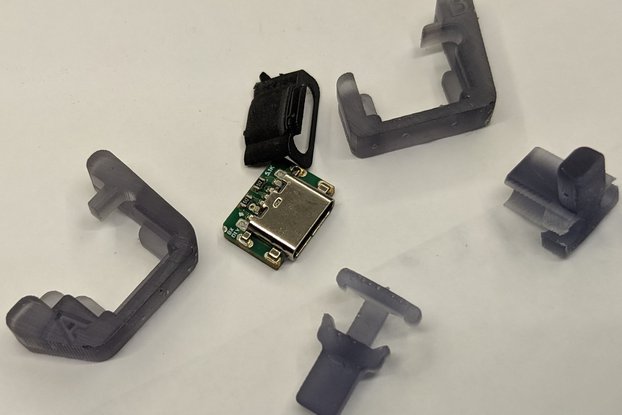
This is a PCB board to replace the 3DS xl charging port so you can use USB-C cables to charge (usb-c to usb-c charging)
Designed by BronxDIY in United States of America
Buy with confidence.
Our Tindie Guarantee protects your purchase from fraud. Learn More
This is a PCB kit to add a USB-C port to the 3DS or 3DS XL, this usbc port supports usbc to usbc charging as well as usb A to usb C charging. It comes with two 5.1k Ohm resistors to negotiate 5 volt …
Read More…This is a PCB kit to add a USB-C port to the 3DS or 3DS XL, this usbc port supports usbc to usbc charging as well as usb A to usb C charging. It comes with two 5.1k Ohm resistors to negotiate 5 volt charging with any usbc charger (you don’t have to worry about your charger having too much power/voltage). This kit comes with a bezel to cover the gaps between the case and the USBC port as well as a resin jig for positioning the USBC port on the motherboard. The bezel has arms to retain the old brass contacts. This kit is for either the original or XL model, you don't have to double check that you have the right version both bezel sets come in the kit.
Mod Difficulty: 6/10, the brass contacts are easy to break and the port requires careful filing
Special Considerations: -The original 3DS requires more filing than the 3DS XL on the port face leaving a much smaller sliver of plastic. It also requires more filing and grinding of the back case to make room for the bezel. -A rotary tool makes this kit far easier to install.
Sanding/fitting: It’s easier to do the sanding first. 1. Remove the pcb from the jig we will be using it to test our fit.
Use a small square file to remove material from the sides of the center hole on the charging port cutout on the 3DS/3DSXL plastic shell. Use the pcb to slip the usbc port into the center hole to test if you’ve filed away enough material, you should have a smooth fit when you’re done. Use a scalpel or razor blade to remove plastic strands and burrs.
REFER FREQUENTLY TO PHOTOS FOR THIS SECTION, A ROTARY TOOL WITH A CYLINDER TIP IS HIGHLY RECOMMENDED: File, scrape, cut the protruding material from the interior portions of the case that sat above the old charging port you should leave the area relatively flat. If you have a rotary tool with a cylinder tip gently and slowly remove material from the interior side of the charging port cutout face making some room for the brass contacts. Slip the bezel on the pcb and try to insert it into the charging port cutout to see which areas you have to cut down. 3DS: If you put the pcb in place you will see that the metal shield for the battery compartment comes too close to the pcb you will have to file or cut the shield and the plastic underneath to make sure it doesn’t obstruct or touch the pcb.
Proceed to the disassembly/installation section and afterwards put the back case back on starting from the audio jack side then levering it down. Click the longer shoulder button cable in first and try to close the case angling the case over the brass contacts, if this is excessively difficult you may need to cut more material or use your soldering iron and tweezers to push the brass contacts further back.
Disassembly/installation:
Disassemble your 3DS or 3DS XL do not unscrew the motherboard or unplug the motherboard cables.
3DS XL: Look at the old charging port use your flush cutters to cut the ‘wings’ (that retain the brass contacts) of the charging port (refer to pictures on the listing). Add flux to the pads of the brass contacts, use your soldering iron (300-330 Celsius) to heat up the brass contact pad/joint (optionally add low temp solder) when the solder is molten lift the contact and wing out with tweezers do it for both contacts.
Add flux to all the joints/pads of the old charging port optionally add low temp solder to those same joint/pads. While rotating your iron between pad all the pads pull gently upwards on the old charging port with tweezers to remove the old charging port. Do not pull hard, you risk lifting pads.
Use soldering wick and your soldering iron to remove solder from the pads leaving it relatively flat. Be careful too much heat can run the risk of lifting pads.
(Preferred) 5. Remove the screws on the side of the motherboard with the charging port. Gently lift the motherboard (it still has screws holding it down on the other side you’re not removing it) and slip the jig with the pcb into place push it in firmly.
(Not recommended). 5. Unscrew the motherboard, unscrew the control stick, remove both the motherboard and control stick (make sure to unplug all cables first). Add flux to the pads of the charging port and use either a hot air station or your soldering iron to remove the port. Take a knife or flush cutters and snip the small plastic ridge under the motherboard to the left and right of the charging port cavity. Slip the jig with the pcb onto the motherboard firmly.
Add flux to the rear pads of the kit pcb, place your soldering iron on one of the outer pads then bring in solder to add to the pad creating a solder fillet. With the iron continuing to heat up the pad use your finger to push down the jig/pcb to lay it flat and slowly remove the iron wait 10 or so seconds to cool the fillet do the same for the other outer pad. Bring your soldering iron to the center pads and add solder, make sure the two pads don’t connect (there’s no need to push the pcb down with the center pads). DO NOT ADD SOLDER TO THE PADS ON THE SIDES.
Use a multimeter in continuity mode to test the center pads and make sure they’re not connected together. Use the multimeter on the cartridge slot shield to test against the usbc shield to see if you have a connection to ground. 3DS: Testing the 5v pad is very difficult without the motherboard removed, there is a tiny via near the right corner of the kit pcb on the motherboard (refer to pictures) test it against the right center pad for continuity (they should be connected). 3DS XL: Use the fuse F1 near the cartridge shield as the motherboard 5v test point against the right center pad of the kit pcb.
Remove the jig, take the old charging port and use thin/pointy tweezers to slip between the flat face of the brass contacts and the plastic ‘wings’ and pull out the brass contacts. While holding it with tweezers flex the smaller ‘arm’ (the one by itself) back and forth until it snaps off, use a small file to remove the nub left from snapping the arm off and do this for both brass contacts.
Place the leg pad of the brass contact onto your soldering wick and use a soldering iron to wick the excess solder off of the leg pad. Insert the brass contacts into the bezel, the tiny arm goes up into the armpit of the bezel press it firmly in place. Slip the bezel with contacts on the usbc port make sure the leg pads sit over the left and right pads of the motherboard.
Add flux to the pads the legs are sitting on, use your iron to heat up the pad then bring in solder creating a fillet then remove the iron (do this for both sides, make sure to create a connection between the castellated holes, the pad underneath and the brass contact legs).
Use your soldering iron to remelt the brass contact fillet and then use your tweezers to gently push the brass contact/bezel forward and while doing so slowly remove your iron and do so for both brass contacts.
Use your multimeter make sure there is no continuity between the brass contacts.
Screw the motherboard back in, if you removed it reconnect all cables (refer to an assembly/disassembly video) then screw it back in place. 3DS: Make sure the slide switch on the charging port side is properly in place
REQUIRED BUT NOT INCLUDED TOOLS: 1. Soldering Iron 2. Flux 3. Solder 4. Phillips screwdriver (size 0 covers most devices) 5. Multimeter with continuity mode 6. Files and/or rotary tool 7. Flush Cutters 8. Tweezers
INCLUDED: 1. USB-C PCB 2. Resin Installation Jig 3. Resin Bezel(s) color(s): A black and a white resin jig for the 3DS XL, A black and a silver resin jig of the 3DS
No country selected, please select your country to see shipping options.
No rates are available for shipping to .
Enter your email address if you'd like to be notified when 3DS / 3DS XL PRO USB-C Replacement port JIG+bezels can be shipped to you:
Thanks! We'll let you know when the seller adds shipping rates for your country.
Shipping Rate | Tracked | Ships From | First Item | Additional Items |
---|---|---|---|---|
:
|
Buy with confidence.
Our Tindie Guarantee protects your purchase from fraud. Learn More
$9.00 $12.00
Free Shipping!
$9.00 $12.00
Free Shipping!
$9.00 $12.00
Free Shipping!
$9.00 $12.00
Free Shipping!
$9.00 $12.00
Free Shipping!
$9.00 $12.00
Free Shipping!
$9.00 $12.00
Free Shipping!
$9.00 $12.00
Free Shipping!
$9.00 $12.00
Free Shipping!
$9.00 $12.00
Free Shipping!
$9.00 $12.00
Free Shipping!
$9.00 $12.00
Free Shipping!
By clicking Register, you confirm that you accept our Terms & Conditions
We recognize our top users by making them a Tindarian. Tindarians have access to secret & unreleased features.
We look for the most active & best members of the Tindie community, and invite them to join. There isn't a selection process or form to fill out. The only way to become a Tindarian is by being a nice & active member of the Tindie community!