Ham Radio Digi Modes Sound Card Interface for FT8 RTTY SSTV...
Designed by elekitsorparts in China
Buy with confidence.
Our Tindie Guarantee protects your purchase from fraud. Learn More
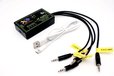
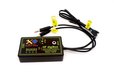
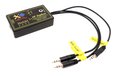
HF digiBox is a handy sound card interface that works with various radio for ham radio digi modes. The product integrates with a USB sound card, an Audio to PTT trigger circuitry, a USB to serial wi…
Read More… HF digiBox is a handy sound card interface that works with various radio for ham radio digi modes. The product integrates with a USB sound card, an Audio to PTT trigger circuitry, a USB to serial with DTR and RTS signals. Moreover, the audio In and Out is isolated with 2 SMT transformers, the PTT trigger(DTR or VOX), CW trigger(RTS) and USB to serial are isolated with optocouplers and a digital isolator from Analog Device. This design ensure a safety connection between your radio and computer. The item not only works with a windows PC, but also a Mac or a single board computer like Raspberry Pi running a Linux.
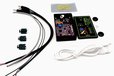
Because there are tons of radio transceivers in the market, and different radios has different connectors. So, theoretically, with different cables, the unit supports all kinds of amateur radio transceivers. We have an option for buying only the box(assembled board with enclosure) without cables, so you can diy your own model with your own specified cables. Currently, we only make models for FT8x7, Elecraft KX3/KX2, uBitx and uSDX (some models) radios.
Speicification:
Features:
Ports & Connectors:
Pins and definitions are as the following. Please pay attention to the pin definition while soldering, be sure to read your radio’s manual before doing this, make sure you have wired the correct signals to the correct port of your radio.

AFO = Audio Frequency OUT, this port should be wired to your radio’s MIC in port.
AFI = Audio Frequency IN, this port should be wired to your radio’s AUDIO OUT port, SPK or PHONE on some sized radios like KX2/KX3, uSDX…
TX|RX = TXD and RXD, this is the TTL(5V) IN and OUT, this port should be wired to your radio’s CAT(TTL) port.
T|R(232) = TXD and RXD in RS232 signal, this port should be wired to your radio’s CAT(RS232) port, e.g. Elecraft KX3
PTT = PTT OUT, PTT control line, should be connected to your radio’s external PTT line.
CW = CW OUT, should be connected to your radio’s KEY or CW port.
PTT Triggering:
There are 3 ways for triggering a PTT, they are “CAT”, DTR and on-board VOX. The “CAT” way is simple and easy, just control your PTT via CAT command, but you have to enable PTT via CAT in your digi mode application.
For othere 2 ways, there is a jumper on the board for setting them. For using on-board VOX, you have to short JS1(by default), and R30 is active for controlling the PTT delay. You can rotate the potentiometer to adjust the PTT delay to your desired one. Do not forget to set PTT to VOX in your digi mode application.
For using DTR signal, just short JS2, a solder station is needed to remove the SMT ferrite bead to JS2. Do not forget to set PTT to DTR in your digi mode application.

Note on uSDX CAT:
The uSDX is able to do the CAT connection, but it is disabled by default. To enable it, you have to compile the code, and common out “//#define CAT 1 // CAT-interface”, then compile and upload the code.
For those uSDX radio with 1602 LCD, because the LCD uses the serial pins for LCD data, some modifications on your radio are needed to be done before the CAT function could work. Since there still have some drawbacks and issues with this modification, so we do not recommend to use the CAT function for uSDX radios with 1602 LCDs. Here is the note from uSDX’s source code on this issue.
uSDXs with OLED displays are fine to work with CAT connection. You have to set the CAT protocol to TS-480 with 38400bps for the communication.
// Since LCD is using PD0(RXD), PD1(TXD) pins in the data-path, some co-existence feature is required when using the serial port.
// The following functions are temporarily disabling the serial port when LCD writes happen, and make sure that serial transmission is ended.
// To prevent that LCD writes are received by the serial receiver, PC2 is made HIGH during writes to pull-up TXD via a diode.
// The RXD, TXD lines are connected to the host via 1k resistors, a 1N4148 is placed between PC2 (anode) and the TXD resistor.
// There are two drawbacks when continuous LCD writes happen: 1. noise is leaking via the AREF pull-ups into the receiver 2. serial data cannot be received.
Purchase Options:
Option 1(Need Soldering): Board + Enclosure + USB-C cable
With this option, you can make your own digi adapter that suits your specific radio. However, you have to prepare the cables or connectors for your radio.
In this option, the PTT trigger is set to on-board VOX by default, and you may need to set the jumper to JS2 if you want a DTR to PTT triggering.
Option 2(Need Soldering): For uBitx = Board + Enclosure + USB-C cable + Cables for uBitx + Connectors for uBitx + Label tape


This option is only for uBitx, you have to do some modifications to the uBitx. We have a tutorial on how to install the digiBox to your uBitx radio, you can put it inside, or you can just wire the connectors and put it outside. Don’t forget to set the PTT triggering to PTT via CAT in your desired digi application. Click to see the installation guide to uBitx.
Option 3 (Ready for Use): For uSDX (DL2MAN 8 Bands) = Board + Enclosure + USB-C cable + 3.5mm Stereo Cables
This option is only for uSDX(DL2MAN 8 Bands), it’s a ready for use option, no soldering needed. Just plug the cables to your uSDX and connect the digiBox to a PC, start a digi application. The PTT triggering is set to DTR by default, you can modify it to the on-board VOX triggering if you wish, but the DTR signal can also be used to CW in CW mode in uSDX.


Option 4 (Ready for Use): For uSDX (Micro Transceiver, 3 Bands) = Board + Enclosure + USB-C cable + 3.5mm Stereo Cables
This option is only for uSDX(Micro Transceiver, 3 Bands), it’s a ready for use option, no soldering needed. Just plug the cables to your uSDX and connect the digiBox to a PC, start a digi application. The PTT triggering is set to DTR by default, you can modify it to the on-board VOX triggering if you wish, but the DTR signal can also be used to CW in CW mode in uSDX.

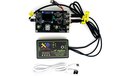
Option 5 (Ready for Use): For Elecraft KX3/KX2 = Board + Enclosure + USB-C cable + 3.5mm Stereo Cables
This option is for elecraft KX3 or KX2 Transceivers, it’s a ready for use option, no soldering needed. The PTT triggering is set to on-board VOX by default, you can modify it to DTR triggering if you wish. CW is triggered by RTS.
Option 6 (Ready for Use): For Yaeasu FT8x7 = Board + Enclosure + USB-C cable + mini Din-8 Cable + mini Din-6 Cable
This option is for Yaesu FT8x7 transceivers, it’s a ready for use option, no soldering needed. The PTT triggering is set to on-board VOX by default, you can modify it to DTR triggering if you wish. CW is triggered by RTS.
Option 7 (Ready for Use): For Xiegu G90s = Board + Enclosure + USB-C cable + mini Din-8 Cable + 3.5mm Stereo Cable
This option is for Xiegu G90s transceiver, it’s a ready for use option, no soldering needed. The PTT triggering is set to on-board VOX by default, you can modify it to DTR triggering if you wish. CW is triggered by RTS.
Buy with confidence.
Our Tindie Guarantee protects your purchase from fraud. Learn More
/i/372623/products/2022-07-07T11%3A01%3A38.068Z-for_kx3_kx2_01.jpg?1657166568)